

The Complete Guide to Creating Expense Reports in NetSuite
Setting up an expense report in NetSuite is a simple process and can be completed by the employee who incurred the expense, or a manager on their behalf.
This blog provides step by step instruction for creating an expense report in NetSuite.
Depending on your role, there are two ways to create the report. If you have an Employee Center based role, you can access the expense report forms by going to your home page, and then selecting the Enter Expense Reports link.

If you do not have an Employee Center based role, you can also access Expense Reports by going to Transactions > Employees > Enter Expense Reports.

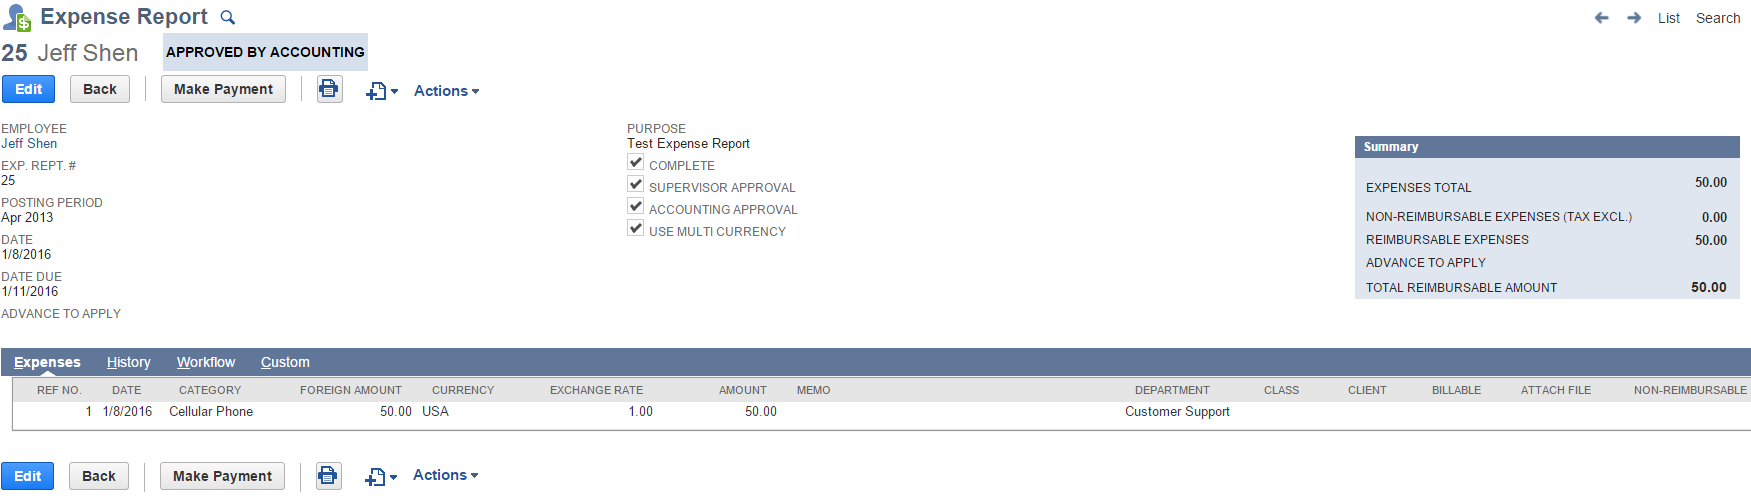
How to complete an expense report:
- Once you are on the Expense Report page, make sure that it defaulted the correct custom form for your company.
- For the Employee box, you will either select your own name, or the person you are creating an expense report for.
- The expense report # will be automatically generated – this is something you can change if you prefer.
- The posting period will set automatically, but will change according to the accounting period the expense report is approved in.
- The date will automatically populate to today’s date – this can also be adjusted if you prefer.
- In the Date Due box, you should select the date that your expense report is due.
- If you have any advances that should be applied to your reimbursement for the expenses you are entering, you will add that amount in the Advance to Apply box.
- In the purpose box, make a brief explanation of what the expense report is for.
- The Complete box should be automatically checked – if you are planning on adjusting this report in the future, unmark this. Only expense reports that are marked as complete will be routed for approval and processing.
- If your account has multicurrency reports enabled, mark the Use Multi Currency box to enter any expenses in foreign currencies.

- Complete the individual line items for your expenses based on your company requirements:
- The Ref No field will automatically populate “1” for the first line item on the report. If you choose to update this number, each new line item will use the following number after that.
- Enter the date the expense was incurred in the date column.
- Enter the category this expense is under in the category column.
- If this expense was in a foreign currency, you will enter this under foreign amount.
- Enter the currency the expense was used with.
- If you used a foreign currency, the exchange rate needs to be entered next.
- The amount should be calculated based on the exchange rate and the foreign amount column. If there was no foreign currency used, you can type the amount of your expense in the amount column.
- If you have a specific note for this line item of your expense report, you can enter it in the memo column.
- If department, class or locations are tracked by your company, you can enter those under their corresponding columns.
- If this line item is billable to a particular customer, you will add their number in the customer column.
- If you use NetSuite OneWorld, you can select a subsidiary from the subsidiary column.
- If this line item is billable to the customer, or to a particular project, you will mark the Billable column.
- In the Attach File column, you have the option to upload your receipt to the expense report line item. You will select from the list of items that are in the file cabinet, or you can select “new” to upload a new receipt.
- If this item is not reimbursable, you will check the Non-Reimbursable box.
- If the receipt is being attached to the line item, check the Receipt box.
- You can now hit “Add” and this will add the line item to your expense report.
- If you have any other line items, you will repeat step 11 for all of them.

- Once you have completed adding the line items you need, you can save the expense report.
- If you are a supervisor approving an expense report, mark the Supervisor Approval box once you have approved a report.

- If you have accounting access, mark the Accounting Approval checkbox, which will indicate that this expense report has been reviewed, approved, and is ready to be paid.

Once you have completed submitting your expense report, it will then be routed to either your manager, or the person with expense report approval authority.
The expense total will remain an unapproved expense account with no accounting impacts until it has been approved. Once the expense report is approved, the bill will be created, and the posting period will be determined.

Creating an expense report in NetSuite is a pretty simple process and can be done by the employee who incurred the expense or by a manager on their behalf. For more NetSuite tips and tricks, visit our NetSuite blog. Or contact us below for private training.
Written by:
Olivia Huie
Consultant
Author: FMT Consultants
Date: April 18, 2016
